Build a Simple Customer Service Chatbot with Elarian [Ep 1]
A Glimpse into Conversational UIs
By Anthony Kiplimo
Hi there, if you’ve landed here, you’re probably wondering about chatbots or ways to build apps on popular messaging services like Telegram, Whatsapp, and Facebook Messenger. Elarian’s customer engagement framework makes it super simple to build engaging chatbots and apps while helping you make use of customer data to better customize experiences for your userbase.
If you would like to know more about Elarian and what it does, don’t hesitate to check out the following article or visit our site and documentation and get started.
An Overview ☺️
In this tutorial, we’ll build a customer service chatbot for a fictional food delivery service, Fikisha. In the process we’ll cover how to:
Set up an Elarian account
The credentials you’ll need for your app
Set up channels on the Elarian dashboard
Build the app that helps our users get help for their delivery service (Fikisha)
This tutorial is built with JavaScript and NodeJS. To go through this tutorial you’ll need to install each tool to get started
Setting up your Elarian Account 🖥
To get started, you can sign in right from the dashboard. Once you complete the onboarding process and log in, you’ll notice that a default test organisation has been created for you. You can take the Quickstart guide to find out about the interesting features of Elarian.
In the meantime, let’s take a look at the credentials you’ll need to create a connection with the Elarian service:
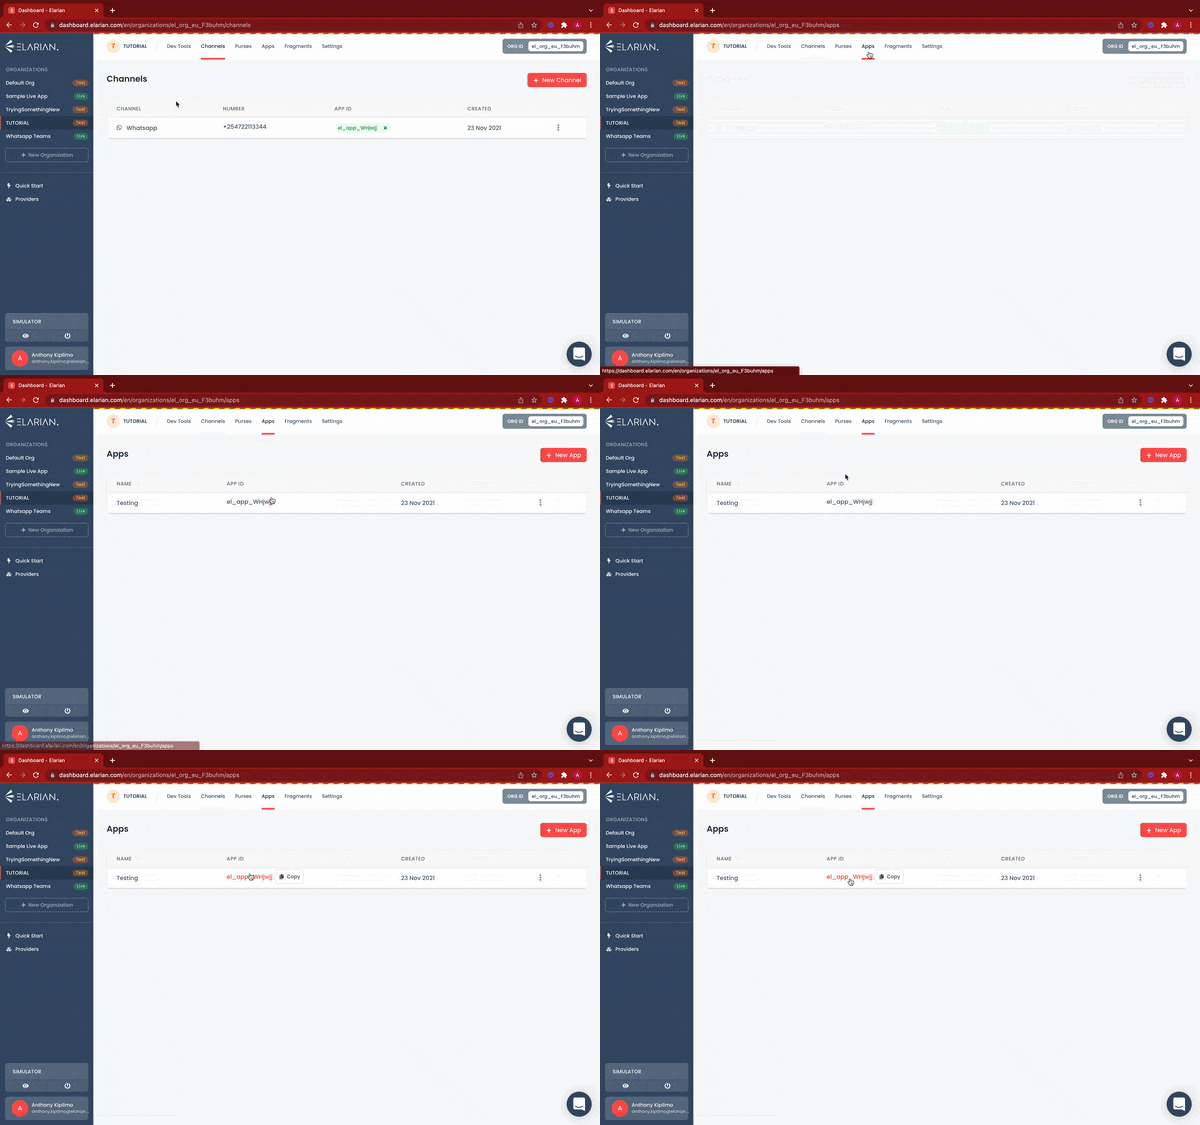
App ID
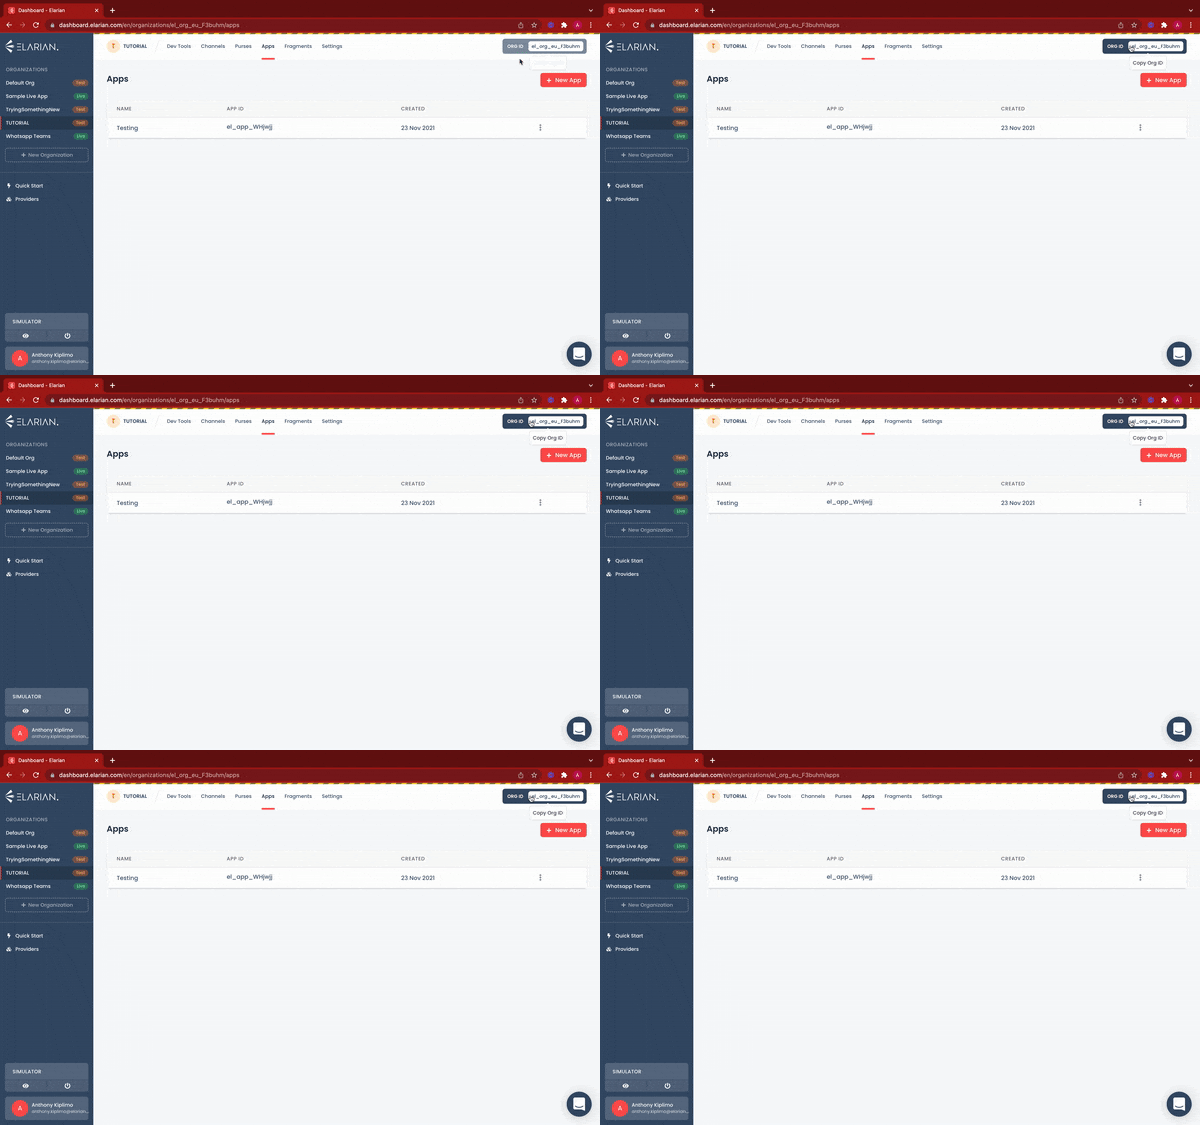
Org ID
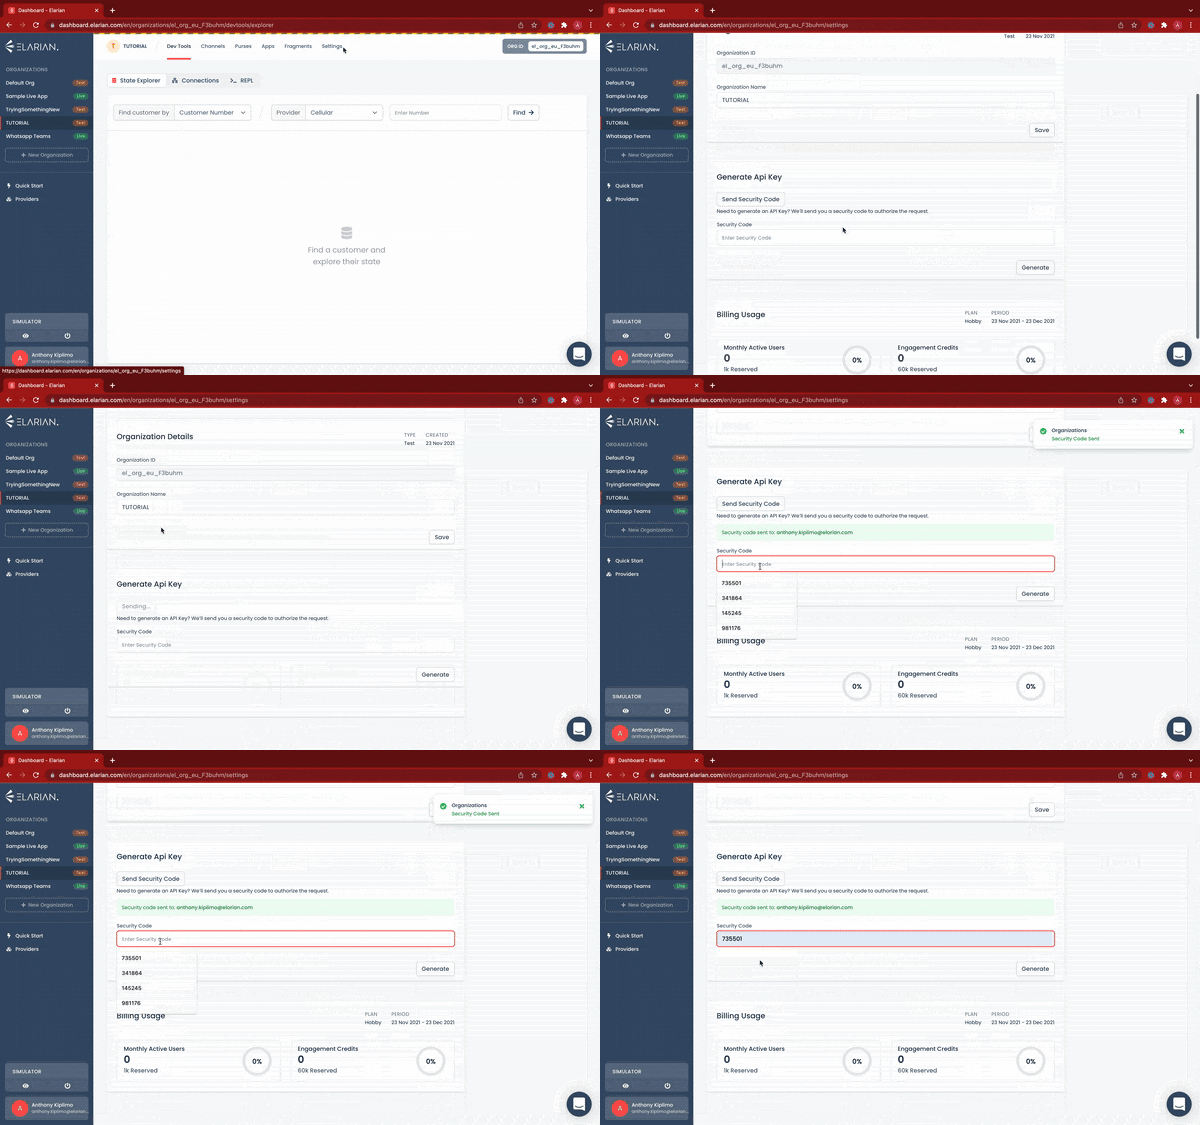
API Key
PS: Elarian doesn’t use HTTP as a core protocol so that means, no callbacks when working with technologies like USSD or Voice. To learn more about how all of this works, check out our engineering piece on building Elarian.
How to get your AppID
 How to get your OrgID
 How to get your API Key
Once you have these values from your dashboard, we can begin writing the base of our app and make a connection to Elarian. Create a new directory that we would be working in:
mkdir support-app && cd support-app
npm init -y
npm i -s elarian
touch app.js
In your app.js file, copy in the following code:
const { Elarian } = require("elarian");

let client;

function start() {
  client = new Elarian(
    appId: "", //Add your AppID here
    orgId: "", // Add your OrgID here
    apiKey: "" // Add your API Key here
  );

  client
    .on("error", (error) => console.error(error))
    .on("connected", () => console.log("Connected to Elarian"))
    .connect();
}

start();
Once you have this, execute the following command on your terminal:
node app.js
On your terminal, you should see the following output as well as an update on the dashboard under the connections tab showing the live connection to Elarian :
Connected to Elarian
And you have made your first connection to Elarian! Next up, we’re going to write the code that’ll get our chatbot up and running.
Setting up the chatbot 🛠
In our use case, we’ll be using WhatsApp as the channel of communication with our customers. The first thing we need to do is create a test WhatsApp channel and a Voice channel for a call for support.
Create WhatsApp channel

Create Voice channel

Each channel is tied to an AppID which identifies buckets of data within your app. Think of your organisation as a wide pool of data with apps as specific buckets of the data.
Next, we’ll start writing some code!
Let’s head back to our previous piece of code, now that we’re able to connect, we need to be able to listen in for events from the customer side and Elarian handles this through event listeners. You can find a list of events in our documentation.
Since we’re listening in for user-initiated WhatsApp messages, we’ll be using the receivedWhatsApp event. Update your code to the following:
client
  .on("error", (error) => console.log(error))
  .on("connected", () => console.log("Connected to Elarian"))
  .on("receivedWhatsapp", (notification, customer) => {
    console.log(notification);
  })
  .connect();
...
This allows us to get two main values from Elarian that we can begin to work with:
notification - this holds key variables from our session with the user including user input which we’ll need for this tutorial
customer - this holds the user’s data including identifiers like their phone number and unique elarian ID
Handling incoming WhatsApp messages
Within the notification object, we have access to the text the user text. In this case we assume that the user sends us the first message to initiate the interaction with the bot.
Let’s refactor our code to manage the customer’s input:
client
  .on("error", (error) => console.log(error))
  .on("connected", () => console.log("Connected to Elarian"))
  .on("receivedWhatsapp", handleWhatsappMessages)
  .connect();
...
The change we’ve made has added a handleWhatsappMessage function to manage comms coming through our Whatsapp channel. Let’s flesh out our function.
const { Elarian } = require("elarian");

let client;

...
async function handleWhatsappMessages(notification, customer, appData, callback) {
  console.log(notification);
}
...
appData and callback won’t come into play in this tutorial but these are the important ideas behind them:
appData - this allows you to store state related data. It provides a way to manage your customer’s state
callback - this allows you to send/set data on the customer (appData) while being useful as well in USSD and Voice interfaces to send through menus or voice responses.
Chatbot Responses 💬
To make our chatbot respond, we need to know what the customer said and how to provide responses. Here’s how we do it:
...

let whatsappChannel = {
  number: "", // Add your whatsapp number
  channel: "whatsapp"
};

let voiceChannel = {
  number: "", // Add your voice number
  channel: ""
};

async function handleWhatsappMessages(notification, customer, appData, callback) {
  console.log(notification);

  if (notification.text === "hi") {
    customer.sendMessage(whatsappChannel, {
      body: {
        text: "Hi there, happy to meet you. Type 'help' to receive a call from one of our agents"
      }
    });
  }
  else if (notification.text === "help") {
    customer.sendMessage(whatsappChannel, {
      body: {
        text: "We'll send you a call shortly"
      }
    });

    setInterval(() => {
      customer.sendMessage(voiceChannel, {
      body: {
        text: {
          say: {
            voice: "female",
            text: "Hi, this is an automated call"
          }
        }
      }
    });
    }, 5000);
  }
}
In this case, we expect our customer to send “hi” as the initial message and “help” as the second message where we’ll send the call.
Let’s test this out. Type in and run:
node app.js
Elarian provides a simulator that provides a phone that mimics the real world.

Summary 📖
In this tutorial, we explored the Elarian dashboard and NodeJS SDK exploring how we could build a simple support response bot. In the next tutorial, we’ll add in state and more complex flows. But for now, you’ve made your first foray into customer engagement and experiences on the platform.
Till next time 😉
Check out out our docs: developers.elarian.com
Join our community to find events and more cool engagements: community.elarian.com

![Build a Simple Customer Service Chatbot with Elarian [Ep 1]](https://cdn.hashnode.com/res/hashnode/image/upload/v1638186496226/Dp9BbMC3J.jpeg?w=1600&h=840&fit=crop&crop=entropy&auto=compress,format&format=webp)
